開頭 #
在架設 Hugo 靜態網站時,最讓人頭痛的其中一件事就是:「怎麼加入留言功能呢?」🤔 常見的留言板方案可能需要載入肥大的第三方腳本,而像是 Valine 或 Artalk 等則需要自己額外架設後端伺服器。
而今天這篇要介紹的 Giscus 簡直就是大救星!它是基於 GitHub Discussions 所打造的留言系統,具備以下超棒的優點:
- 完全免費、無廣告:依託 GitHub 平台,不需要額外付費租用伺服器。
- 資料掌握在自己手上:所有的留言都會同步儲存在您的 GitHub Repository 的 Discussions 中。
第一步:準備 GitHub 倉庫與啟用 Discussions #
可以新建一個專門存放留言的 Repo,也可以使用現有的您的 Hugo 網站原始碼 repo,但:
- 該 GitHub Repo 必須是 公開的 (Public)。(如果是 Private 的話訪客會無法讀取與留言唷!)
- 必須啟用 Discussions 功能:
- 進入要使用的 GitHub Repo 頁面。
- 點擊上方導覽列的 Settings。
- 在左側選單的 Features 區塊中,找到 Discussions 並將其打勾啟用。

第二步:安裝 Giscus GitHub App #
為了讓 Giscus 能夠存取您的 Discussions,需要在倉庫中安裝官方的 GitHub App:
- 前往 Giscus 官方網站 進行設定。
- 在網頁中下方找到 安裝 giscus 應用程式 的連結(或是直接點擊 這裡前往安裝)。
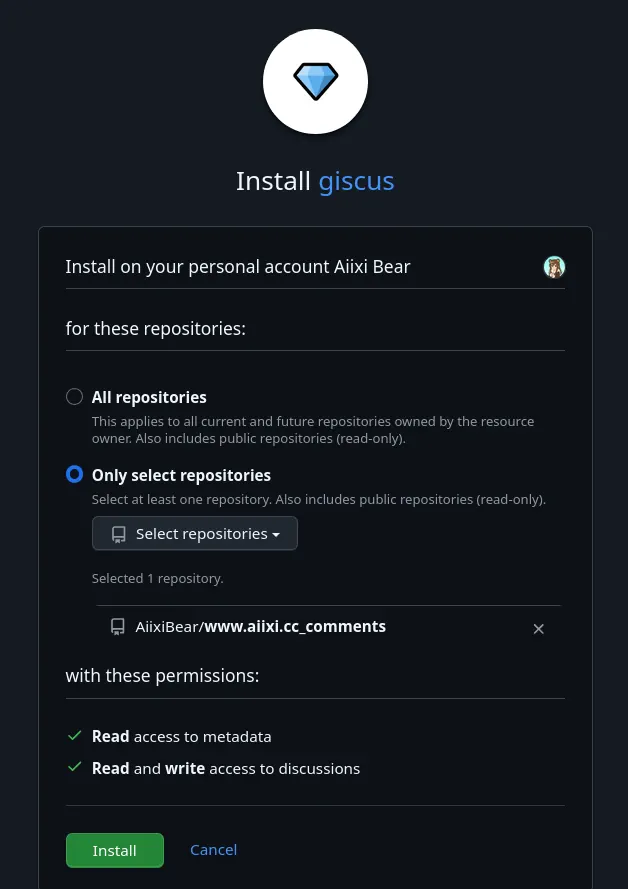
- 選擇您要授權的 GitHub 帳號或組織,並選擇 Only select repositories,指定您放網站的那個 Repo。
- 點擊 Install & Authorize 完成安裝!🎉
示範:
第三步:取得 Giscus 配置參數 #
回到 Giscus 官網,往下填寫設定:
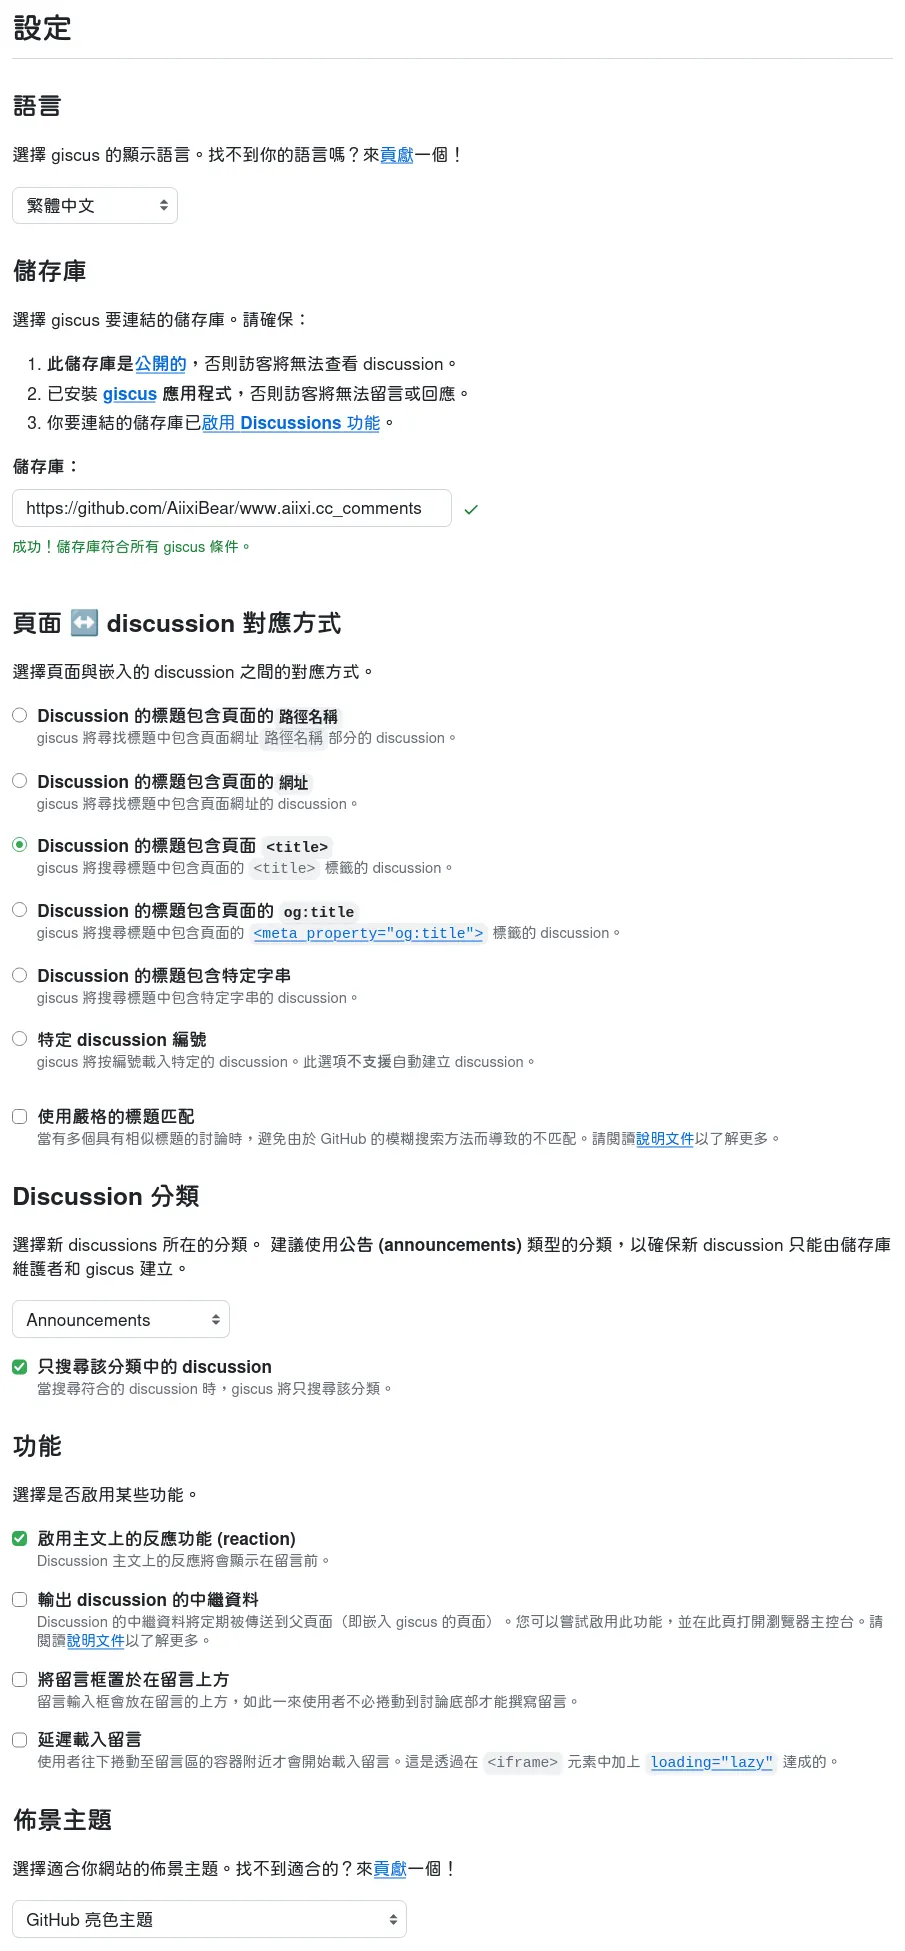
- 倉庫:填入
GitHub用戶名/倉庫名(例如:yourname/my-blog)。 - 頁面與 Discussions 的對應方式:建議選擇
pathname(網址路徑),這樣每個頁面就會對應到一個獨立的 Discussion,但我是選title,因為好看啊! - Discussion 分類 (Category):建議選擇
Announcements。 - 主題 (Theme):可以選擇
preferred_color_scheme,但我是選light,因為等下的步驟中,我會直接在留言板背景插入一個白色方塊避免顏色被吃掉! - 網頁下方就會自動生成一段專屬於您的
<script>設定碼,長得會像這樣:
<!-- 這只是範例,不要使用這段程式碼,請依照自己拿到的程式碼為準! -->

<script src="https://giscus.app/client.js"
        data-repo="yourname/my-blog"
        data-repo-id="R_kgD..."
        data-category="Announcements"
        data-category-id="DIC_kwD..."
        data-mapping="title"
        data-strict="0"
        data-reactions-enabled="1"
        data-emit-metadata="0"
        data-input-position="bottom"
        data-theme="light"
        data-lang="zh-TW"
        crossorigin="anonymous"
        async>
</script>
第四步:整合到 Hugo 佈景主題中 #
接下來要把這段程式碼放進 Hugo 的文章模板裡。不同的佈景主題做法可能略有不同,但一般標準的做法是建立或修改 Partial 模板。
我使用的是 Blowfish Themes,要修改的檔案位於 themes/blowfish/layouts/partials/article-comments.html,在這裡使用這個檔案示範。
0. 在設定檔中開啟 showComments 選項
#
在 Hugo 的設定檔,例如 params.toml 等等,打開留言選項。
# config/_default/params.toml
[article]
    ### 其他設定略
    showComments = true
1. 建立留言板 Partial 檔案 #
在您主題資料夾底下的 layouts/partials/ 目錄中,建立一個名為 article-comments.html 的檔案,覆蓋 Blowfish 預設的留言板模版,建立自己的留言板模版:
{{ if and
  (strings.HasPrefix .File.Path "posts/")
  (.Params.showComments | default (site.Params.article.showComments | default false))
}}
  {{ if templates.Exists "partials/comments/giscus.html" }}
    <div class="pt-8">
      <hr>
      <br>
      {{/* 標題與說明文字區塊 */}}
      <div class="mb-6 flex flex-col gap-1">
        {{/* 標題與裝飾圓點 */}}
        <div class="flex items-center gap-2">
          <h2 class="mt-8 text-2xl font-extrabold mb-10">
            留言區
          </h2>
          <span class="h-2 w-2 rounded-full bg-primary-500 inline-block"></span>
        </div>

        {{/* 輔助說明文字 */}}
        <p class="text-sm text-neutral-500 dark:text-neutral-400">
          歡迎針對文章內容提出想法或交流!點擊下方按鈕即可載入 Giscus 留言板,使用 GitHub 登入即可留言喔!
        </p>
      </div>

      {{/* 留言載入與按鈕區塊 */}}
      <div class="pt-2 flex flex-col items-center justify-center min-h-[120px]" id="comments-wrapper">
        {{/* 載入留言按鈕 */}}
        <button
          type="button"
          id="load-comments-button"
          onclick="loadGiscusComments()"
          class="px-6 py-3 rounded-lg border border-neutral-300 dark:border-neutral-700 bg-neutral-100 dark:bg-neutral-800 text-neutral-700 dark:text-neutral-200 hover:bg-neutral-200 dark:hover:bg-neutral-700 transition-colors font-medium text-base focus:outline-none">
          載入留言板
        </button>

        {{/* 留言載入容器:設定固定的純白背景與深色文字,不會隨主題變黑 */}}
        <div id="comments-container" class="w-full p-4 rounded-xl bg-white border border-neutral-200 text-neutral-900 shadow-sm"></div>
        {{ partial "comments/giscus.html" . }}
      </div>
    </div>
  {{ else }}
    {{ warnf "[BLOWFISH] Comments are enabled for %s but no comments partial exists." .File.Path }}
  {{ end }}
{{ end }}
註:模版中我只允許路徑是 /posts/* 的文章,以及有啟用 showComments,留言板才會顯示。
註:這裡的 loadGiscusComments() ,我會在下方的 giscus.html 中實作動態插入
<script>標籤的 JS 邏輯,達到點擊按鈕後才非同步載入 Giscus 的效果~
小技巧:有些熱門的 Hugo 主題(例如 Hugo PaperMod、DoIt、FixIt 等)本身就在內建設定檔裡原生支援 Giscus 了!您只需要打開主題的
hugo.toml(或params.toml),找到[params.giscus]區塊,把對應的repo、repo-id、category-id填進去就可以直接啟用,完全不需要自己手動刻模板唷!因主題而異,可以去檢查看看自己的 Hugo 主題支不支援。
2. 建立 giscus 專屬模版 #
在 layouts/partials/ 新增一個資料夾 comments,並在裡面加入 giscus.html,注意!這裡並不是直接貼入 giscus 生成的腳本,所以請替換為自己的參數。
<script>
/**
 * 延遲載入 Giscus 留言系統
 */
let giscusLoading = false;
let giscusLoaded = false;

function loadGiscusComments() {
  const button = document.getElementById('load-comments-button');
  const container = document.getElementById('comments-container');

  if (!container || giscusLoading || giscusLoaded) {
    return;
  }

  // 防止重複建立 Giscus 腳本
  if (document.getElementById('giscus-script')) {
    return;
  }

  giscusLoading = true;

  if (button) {
    button.disabled = true;
    button.textContent = '正在載入留言板…';
  }

  const script = document.createElement('script');
  script.id = 'giscus-script';
  script.src = 'https://giscus.app/client.js';
  script.async = true;
  script.crossOrigin = 'anonymous';

  script.setAttribute('data-repo', '請替換');
  script.setAttribute('data-repo-id', '請替換');
  script.setAttribute('data-category', '請替換');
  script.setAttribute('data-category-id', '請替換');
  script.setAttribute('data-mapping', 'title');
  script.setAttribute('data-strict', '0');
  script.setAttribute('data-reactions-enabled', '1');
  script.setAttribute('data-emit-metadata', '0');
  script.setAttribute('data-input-position', 'bottom');
  script.setAttribute('data-theme', 'light');
  script.setAttribute('data-lang', 'zh-TW');

  script.onload = function () {
    giscusLoading = false;
    giscusLoaded = true;

    if (button) {
      button.style.display = 'none';
    }
  };

  script.onerror = function () {
    giscusLoading = false;
    giscusLoaded = false;

    script.remove();

    if (button) {
      button.disabled = false;
      button.textContent = '載入失敗,請重試';
    }
  };

  container.appendChild(script);
}
</script>
第五步:本地測試與部署 #
設定完成後,可以在本地端執行指令來預覽效果:
hugo server打開瀏覽器前往文章頁面,捲動到最下方,如果順利看到 Giscus 的登入按鈕與留言輸入框,就代表大功告成啦!
結尾 #
本部落格一樣有插入 giscus 留言板,在文章頁面最下方,歡迎留言!