This article and the routing optimization methods described herein are strictly applicable only to Chunghwa Telecom (HiNet) home broadband in Taiwan. If you are using a different country, region, or ISP, your international backbone and peering conditions will differ entirely—do not apply blindly!
Introduction #
In Taiwan, how terrible HiNet’s peering is with Fastly and Cloudflare has long been a hot topic among Chunghwa Telecom users: downloading from GitHub over IPv4 can crawl to a fraction of a MB/s, while switching to IPv6 makes it as fast as another ISP. Other issues include Cloudflare CDN nodes never getting assigned local Taiwan nodes, X (Twitter) image CDNs crawling to a halt, and more.
The decade-long love-hate relationship between Cloudflare/Fastly CDN and Chunghwa Telecom (HiNet) centers around “disagreements over peering fees” and “international bandwidth routing detours.”
Cloudflare even complained on their blog that transit costs in Taiwan (HiNet) are 15 times higher than in Europe or North America: https://blog.cloudflare.com/bandwidth-costs-around-the-world/
“Two Asian locations stand out as being especially expensive: Seoul and Taipei. In these markets, with powerful incumbents (Korea Telecom and HiNet), transit costs 15x as much as in Europe or North America, or 150 units.”
Solution #
The solution that others have tested and that I wanted most is to route the traffic taking these subpar paths into Cloudflare’s own edge network—the WARP tunnel—while leaving all other normal traffic completely untouched to avoid triggering other connection issues.
Environment: Xiaomi AX3000T (running flashed OpenWrt 24.10.5), pbr 1.2.2. Prerequisite: You have a Cloudflare Zero Trust organization, or you can directly use the free CF WARP version via wgcf, but this article uses wgcf-teams.
My actual experience: Setting up the Cloudflare WARP WireGuard tunnel itself takes only fifteen minutes; the real time-consuming part was configuring OpenWrt’s policy-based routing, which broke several times.
Architecture Overview #
Any PC --(registered via wgcf-teams-go)--> Zero Trust Org --> Generates warp-zt.conf (WireGuard config file)
Router: warp interface (WireGuard) + Dedicated Firewall Zone (NAT44 + NAT66)
pbr:   CDN-via-WARP  (IPv4 Destination List) --\
       CDN-via-WARP6 (IPv6 Destination List) ----> Exit via Cloudflare WARP
Remaining Traffic: Native Path (Chunghwa Telecom Broadband WAN)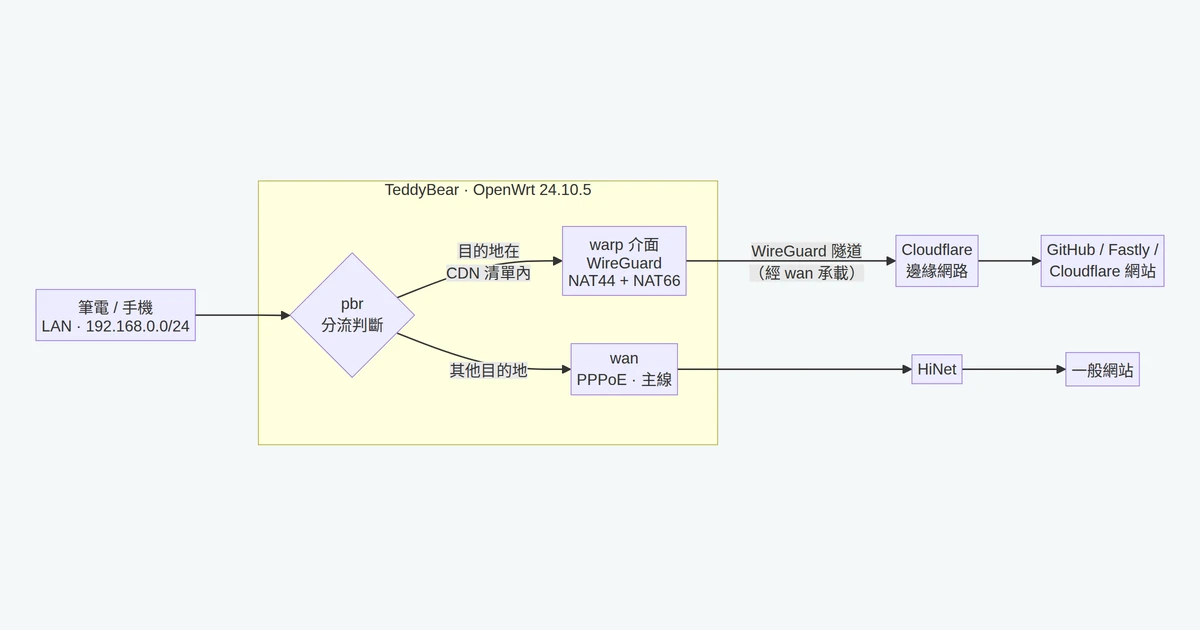
Step 1: Generate WireGuard Config Using wgcf-teams #
Tool GitHub: https://github.com/poscat0x04/wgcf-teams
The Zero Trust dashboard does not have a feature to “export WireGuard configuration for routers”; it assumes all devices use the official app. The community tool wgcf-teams-go bridges this gap: it registers a device in your organization using your ZT identity and directly outputs a standard WireGuard configuration.
First, make sure your login identity has permission to register devices in the ZT dashboard under Settings > WARP Client > Device enrollment, and note down your team name—which is the subdomain of your login URL https://<team>.cloudflareaccess.com.
wgcf-teams-go does not have pre-compiled releases, so you must install it via Go:
# Install Go if it is not already installed on your system
sudo apt install golang-go
go install github.com/PeronGH/wgcf-teams-go@latestGenerate the WireGuard config (replace <team> with your actual team name):
~/go/bin/wgcf-teams-go <team> > ~/warp-zt.conf
chmod 600 ~/warp-zt.conf
When executed, it will open a browser to https://<team>.cloudflareaccess.com/warp. After logging in with your ZT account, the page will provide a URL link starting with com.cloudflare.warp://...?token=... (you can right-click the button and copy the link address), then paste the entire string back into your terminal.
Note: The token only has a 60-second lifespan. Paste it immediately after logging in; if it expires, re-run the command.
The generated warp-zt.conf is in standard wg-quick format:
# This is just an example, please refer to your actual configuration!
[Interface]
PrivateKey = <Private confidential keep key, strictly>
Address = 100.96.0.10/32
Address = 2606:4700:cf1:1000::a/128
MTU = 1420

[Peer]
PublicKey = bmXOC+F1FxEMF9dyiK2H5/1SUtzH0JuVo51h2wPfgyo=
AllowedIPs = 0.0.0.0/0, ::/0
Endpoint = engage.cloudflareclient.com:2408
A friendly reminder: The PrivateKey is the credential for this tunnel. Do not share it with others (and preferably not with AIs either).
Step 2: Install WireGuard on the Router and Create the warp Interface
#
In OpenWrt LuCI, go to System > Software, click Update lists, and install luci-proto-wireguard (which automatically pulls in kmod-wireguard and wireguard-tools). Next, go to Network > Interfaces, click Add new interface…, name it warp, set protocol to WireGuard VPN, and copy the fields from your generated WG config over.
(If the WireGuard protocol option does not appear, try reloading the web UI or rebooting the router.)

At the bottom of the settings page, you can directly click Import config and paste the entire configuration file into LuCI; it will automatically parse and fill in the fields!
Key Point: Allowed IPs set to 0.0.0.0/0 and ::0/0 + Do not check Route Allowed IPs is the standard setup for pbr mode. The former allows the tunnel to accept any destinations sent by pbr; leaving the latter unchecked prevents netifd from pushing the default route directly into the main routing table and pulling all devices into the tunnel. Routing decisions are left entirely to pbr.
For the firewall, assign warp to a dedicated zone (do not share the wan zone, see Pitfall 4 for reasons):
zone warp:
  input REJECT / output ACCEPT / forward REJECT
  masquerading enabled, masq6 enabled, mtu_fix enabled
  Covered networks: warp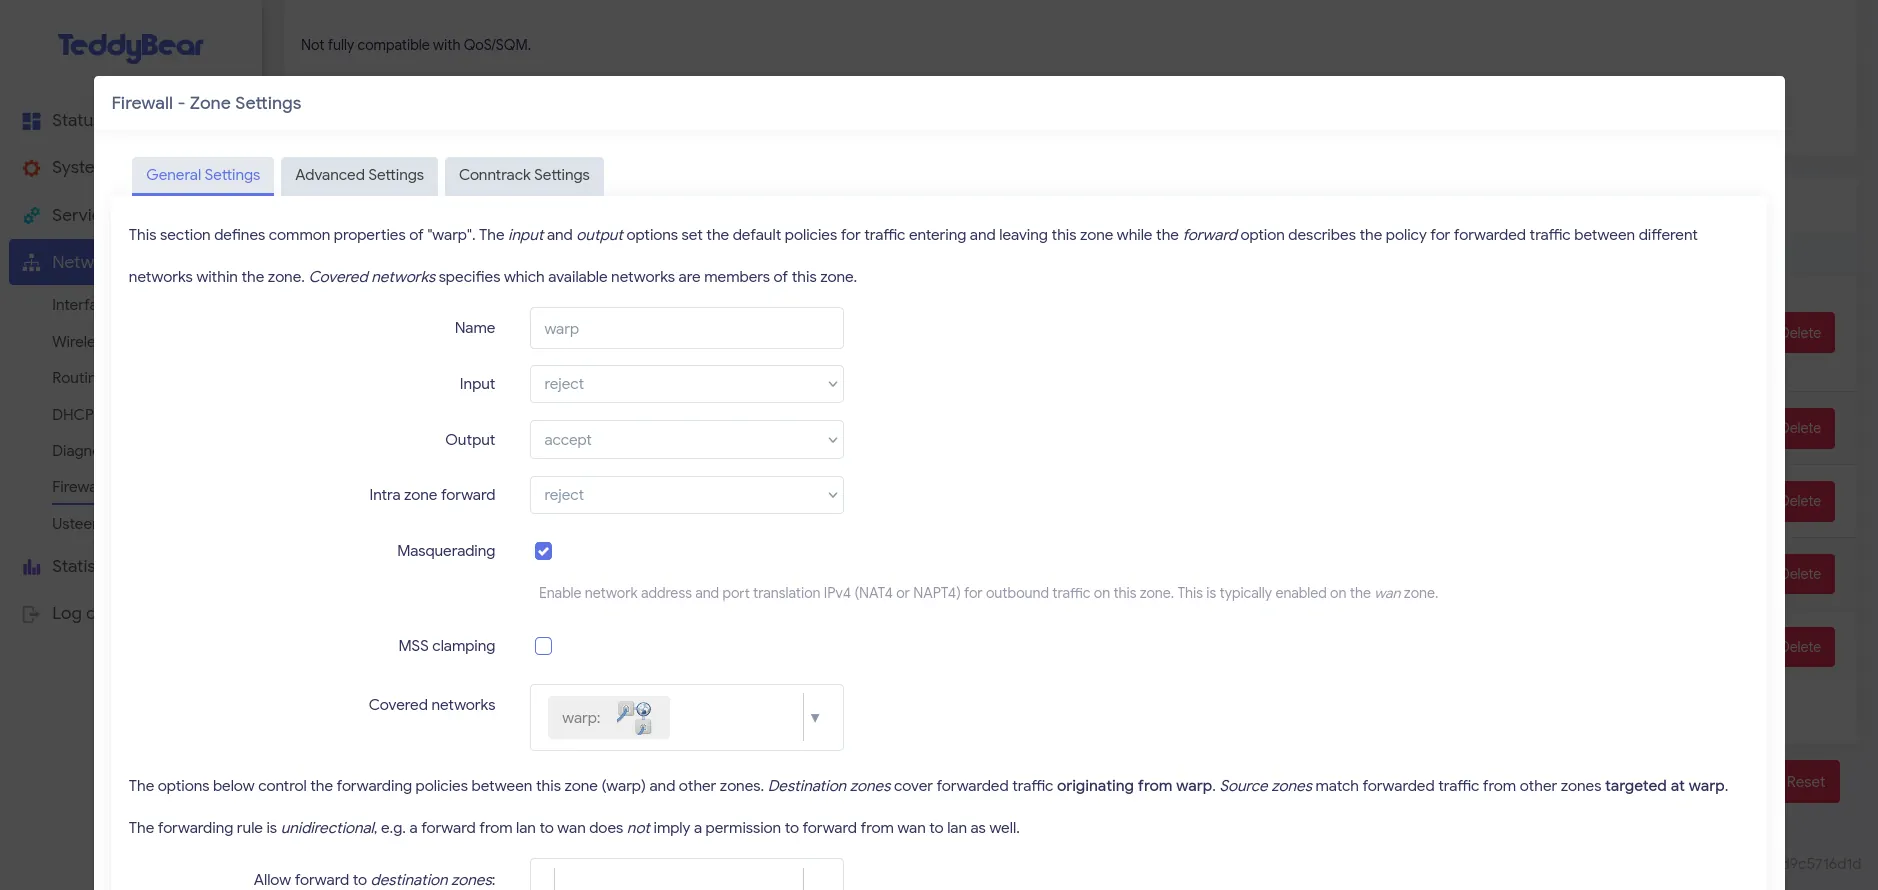
Then add a traffic rule in the firewall settings to allow lan -> warp:
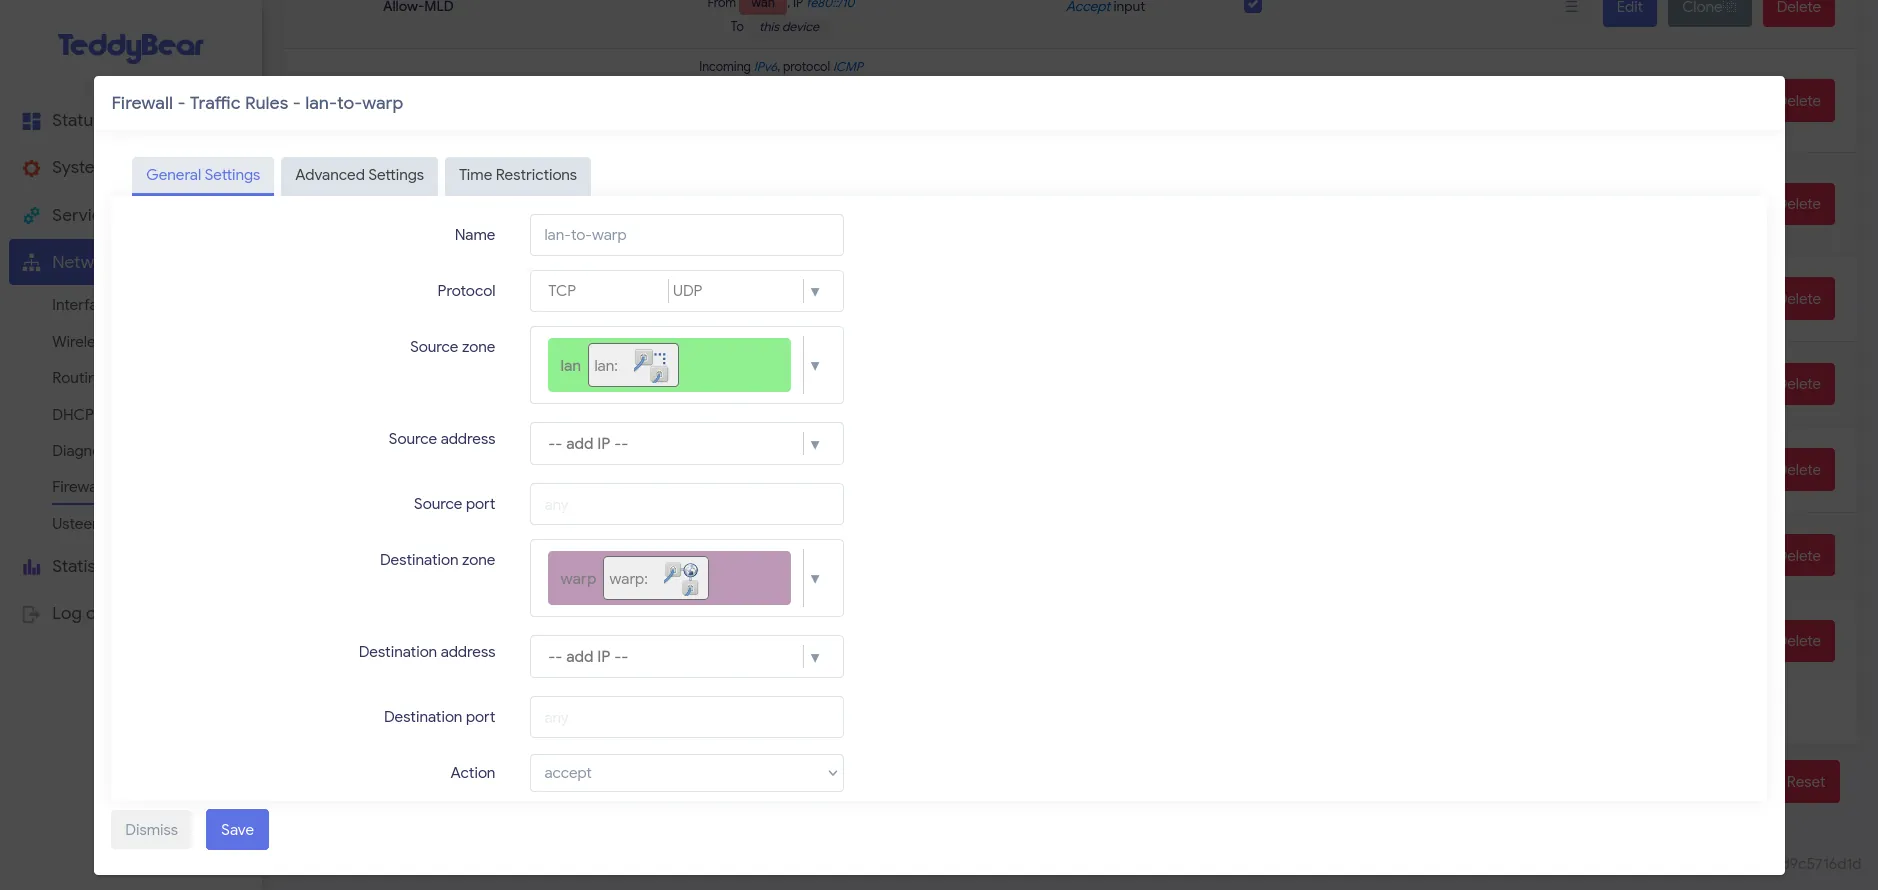
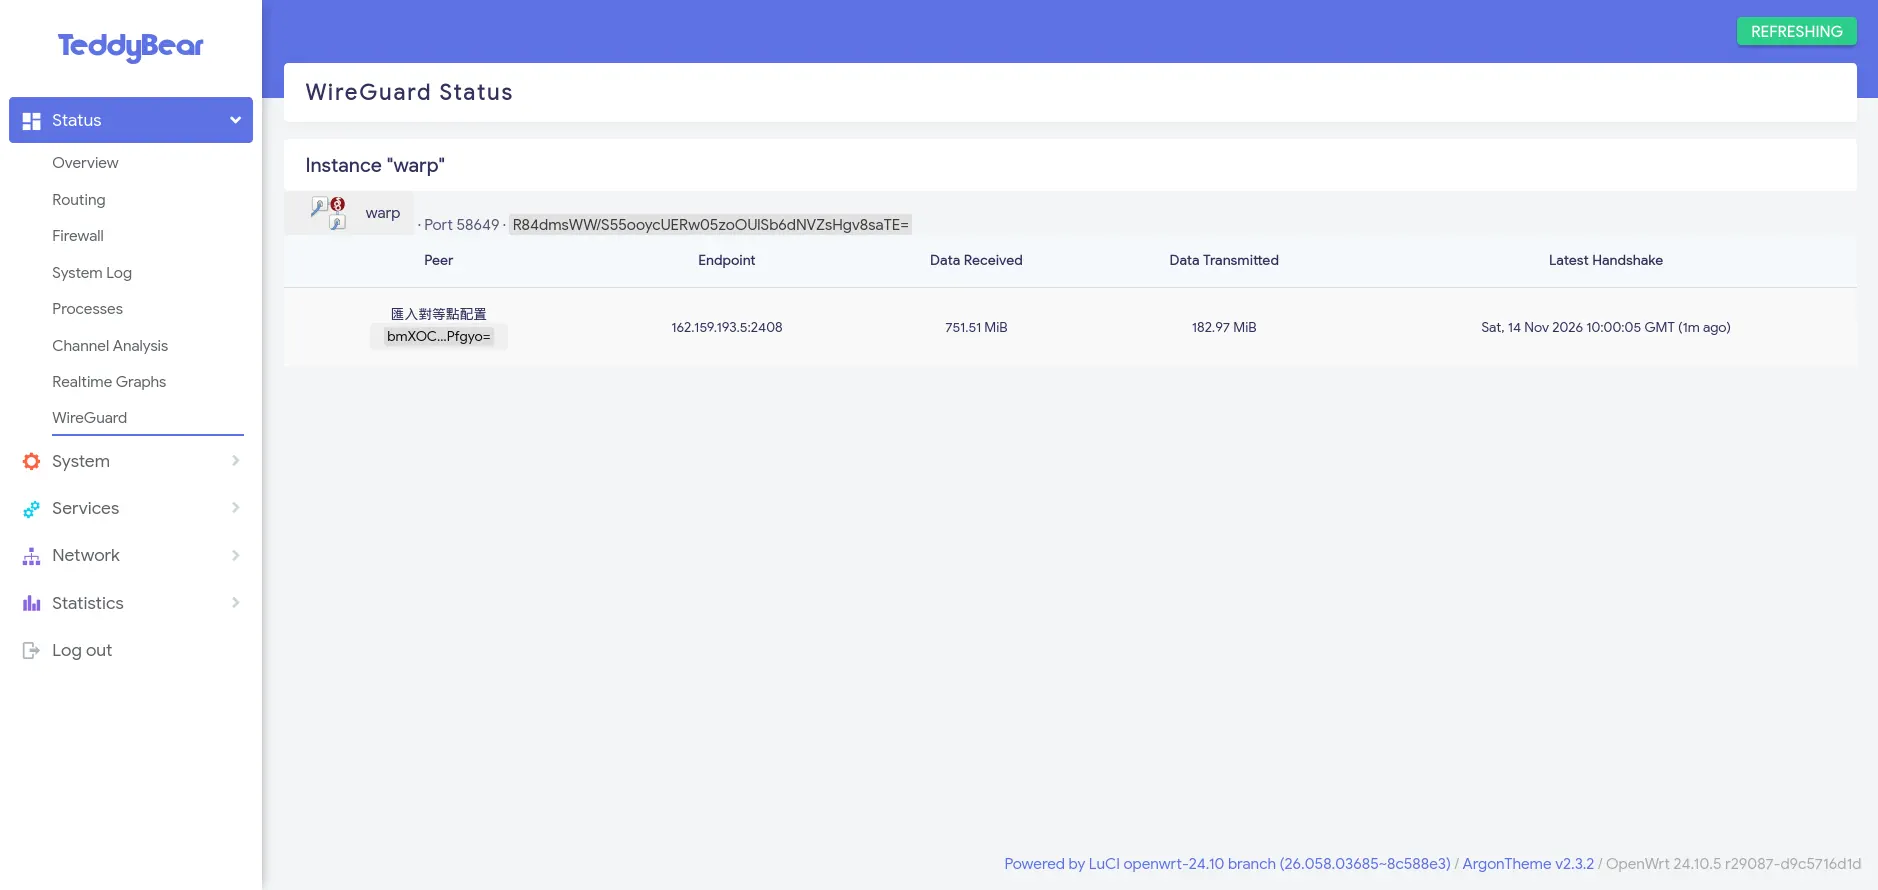
After saving and applying, check if the WireGuard status shows a Latest handshake and the RX/TX counters start incrementing. If so, the tunnel is successfully established.
Step 3: Prepare the Destination IP Lists #
All CDN IP list sources are official:
- Cloudflare IPv4 / IPv6: Official IP list (https://www.cloudflare.com/ips/) — 15 v4 blocks, 7 v6 blocks.
- Fastly: Official API (https://api.fastly.com/public-ip-list) — 21 v4 blocks, 3 v6 blocks.
- GitHub:
185.199.108.0/22and2606:50c0::/32— These two blocks are not in any of the above lists, but GitHub release downloads actually route through here. Omitting them means your setup won’t cover GitHub.
This totals 37 IPv4 blocks and 11 IPv6 blocks.
Step 4: pbr Dual Policies #
pbr (Policy Based Routing) is a routing method determined by network administrators based on specific routing rules rather than just destination IP addresses (Wikipedia).
Installing the relevant OpenWrt package enables this feature.
Prerequisite: pbr is installed (package luci-app-pbr), and pbr IPv6 support is enabled (in LuCI under pbr settings, or via UCI pbr.config.ipv6_enabled='1').
Create two policies (in LuCI under Services > Policy Routing):
CDN-via-WARP    src 192.168.0.0/24  ->  dest 37 IPv4 blocks  ->  interface warp
CDN-via-WARP6   src (leave blank)   ->  dest 11 IPv6 blocks  ->  interface warp
The source for the v6 policy is intentionally left blank: LAN IPv6 prefixes change dynamically whenever Chunghwa Telecom reconnects (PPPoE redial), so binding a hardcoded source is a ticking time bomb. Since usually only the LAN uses IPv6, leaving it blank effectively applies to the entire LAN.
Alternatively, you can use UCI to create them all at once (SSH into your router and paste the entire block):
uci add pbr policy
uci set pbr.@policy[-1].name='CDN-via-WARP'
uci set pbr.@policy[-1].interface='warp'
uci set pbr.@policy[-1].src_addr='192.168.0.0/24'
uci set pbr.@policy[-1].dest_addr='173.245.48.0/20 103.21.244.0/22 103.22.200.0/22 103.31.4.0/22 141.101.64.0/18 108.162.192.0/18 190.93.240.0/20 188.114.96.0/20 197.234.240.0/22 198.41.128.0/17 162.158.0.0/15 104.16.0.0/13 104.24.0.0/14 172.64.0.0/13 131.0.72.0/22 23.235.32.0/20 43.249.72.0/22 90.98.0.0/17 90.98.128.0/18 103.244.50.0/24 103.245.222.0/23 103.245.224.0/24 104.156.80.0/20 140.248.64.0/18 140.248.128.0/17 146.75.0.0/17 151.101.0.0/16 157.52.64.0/18 167.82.0.0/17 167.82.128.0/20 167.82.160.0/20 167.82.224.0/20 172.111.64.0/18 185.31.16.0/22 199.27.72.0/21 199.232.0.0/16 185.199.108.0/22'
uci add pbr policy
uci set pbr.@policy[-1].name='CDN-via-WARP6'
uci set pbr.@policy[-1].interface='warp'
uci set pbr.@policy[-1].dest_addr='2400:cb00::/32 2606:4700::/32 2803:f800::/32 2405:b500::/32 2405:8100::/32 2a06:98c0::/29 2c0f:f248::/32 2a04:4e40::/32 2a04:4e42::/31 2a04:4e44::/32 2606:50c0::/32'
uci commit pbr
/etc/init.d/pbr restart
Upon restart, both policies should show [✓] with no errors in the output.
Pitfall 1: A single pbr policy can only handle a single IP family. I originally crammed all 48 blocks into a single policy (mixing IPv4 sources with IPv4/IPv6 destinations). Upon restart, all 11 IPv6 blocks threw
Unknown entry in policy 'CDN-via-WARP'errors while IPv4 remained silent. After reviewing pbr’s init script source code, the mystery was solved: its processing loop groups sources and destinations by family. When the source group was IPv4, it directly skipped the IPv6 destination group. When it reached the IPv6 source group, my source filter evaluated to empty, so the loop never ran. Consequently, the v6 entries were never processed by any group and were ultimately categorized as Unknown. Pbr documentation doesn’t mention this rule, and the fix is simply splitting them into the two separate policies shown above.
Pitfall 2: pbr IPv6 support is disabled by default. Before switching to destination-based splitting, I tried a source policy of “routing my entire laptop through WARP.” At that time, IPv6 support wasn’t enabled, so the policy only captured IPv4 while my laptop and browser preferentially used IPv6—resulting in most traffic slipping past the tunnel and continuing over native IPv6 (traceroute showed the source was HiNet IPv6,
warp=off, and colo was still in SIN). Browsing appeared completely broken while gateway pings, dig, and nslookup all worked normally, almost leading me to misdiagnose it as a DNS failure. As a side note, another small hiccup during this period: pbr’s defaultuplink_interface6iswan6, but my interface was namedwan_6. Without aligning this, v6 routing configurations would behave erratically. Conclusion: Enable IPv6 support first, match interface names, then set up policies. Also learned: forcing an entire machine into a tunnel is overkill, which led to switching to destination-based routing.
Pitfall 3: If your DNS server is not dnsmasq, do not use pbr’s domain mode. pbr handles domain-based routing by having dnsmasq feed query resolution results into
nft set. My home DNS uses AdGuard Home answering on port 53, while dnsmasq on port 5353 only manages the local LAN domain, meaning pbr never received any data. This guide strictly uses IP-address-block mode. If your DNS is also outsourced to services like AdGuard or Pi-hole, keep this in mind!
Step 5: Verification #
Having green policies is only a configuration victory; packet-level behavior must be verified. Run a -4 and -6 trace comparison using any website within Cloudflare’s network (I use my own www.aiixi.cc):
curl -4 -s https://www.aiixi.cc/cdn-cgi/trace | grep -E 'ip|colo|warp'
# Expected: ip=[CF's IPv4], warp=on

curl -6 -s https://www.aiixi.cc/cdn-cgi/trace | grep -E 'ip|colo|warp'
# Expected: ip=[CF's IPv6], warp=on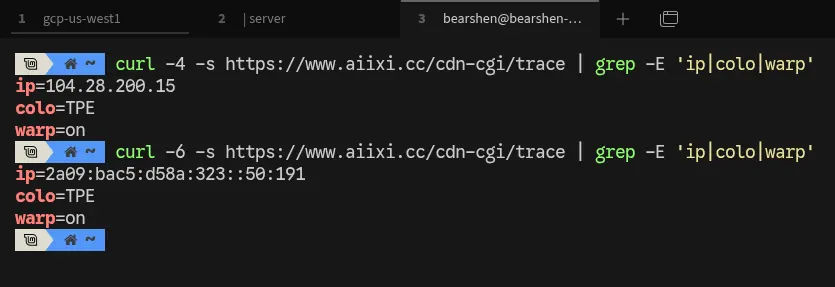
Both sources should be Cloudflare WARP IPs rather than your home Chunghwa Telecom IP addresses. Finally, test the download speed of a large GitHub release file and compare it with pre-routing speeds (Chunghwa Telecom direct peering with Fastly previously measured around 0.35–0.45 MB/s, though throttling can be random).
By doing this, Cloudflare CDN will no longer assign you suboptimal nodes like Singapore, Japan, or Hong Kong. If the routing split works correctly, it will directly assign a Taipei Cloudflare node, noticeably speeding up web page and image resource loading.
The footer of the website you are currently browsing (my site) also displays the Cloudflare node you are connected to. If it displays Server: Taipei, Taiwan (TPE), it means the policy routing is likely working correctly.
Pitfall 4: IPv6 through the tunnel also requires NAT66, otherwise it will suffer a silent death. This was the final and most insidious pitfall I encountered: after all policies turned green, v4 traffic for listed websites worked while v6 timed out. The reason is that v4 packets are masqueraded before entering the tunnel, rewriting their source to the tunnel address (
100.96.0.10), which Cloudflare recognizes and can route back to. However, IPv6 does not have NAT enabled by default, so packets entered the tunnel carrying their original HiNet source address (2001:b011:...). Since WireGuard’s cryptokey routing only recognizes the peer-registered tunnel address, mismatched sources are directly dropped by Cloudflare without returning any error messages. The fix is enablingmasq6on the dedicated firewall zone created in Step 2, ensuring v6 packets are also rewritten to the tunnel address before exiting the tunnel. Therefore, do not take shortcuts by reusing thewanzone—its masquerading only covers the v4 half.
References #
[From Rotaeno] Yooh - Secret Illumination [Official Audio]